Using this inexpensive system, one person can completely paint 4,000 jigs with white basecoat, color coat and clear coat in about 9 hours. The following method works well on jigs up to 2 oz. in size.
Set Up for Liquid Dip Process
Begin by making a table 6' long by 24" wide and 32" high using
3/4" plywood and 2 x 4s. Using four 2 x 2s spaced evenly across
the back of your table to serve as frame, fasten a 4' x 6' piece of 1/4" pegboard
with the bottom resting on the table for added stability. Remember that
this pegboard may be holding as much as 150 lbs. of jigs when full, so
stabilize appropriately. Next, screw a 1" x 10" x 4' piece
of pine board to the left and right edge of the pegboard, forming a 3
sided enclosure. Now remove the heating element from a 6' section of
120V electric base board heater. Fasten the element with metal brackets
about 1-1/2" above the top of the table and about 4" in front
of the pegboard, centered left to right on the table. Attach a cord with
a 120V male plug to the element. This will be your heat source for driving
off solvent while the jigs hang overnight.
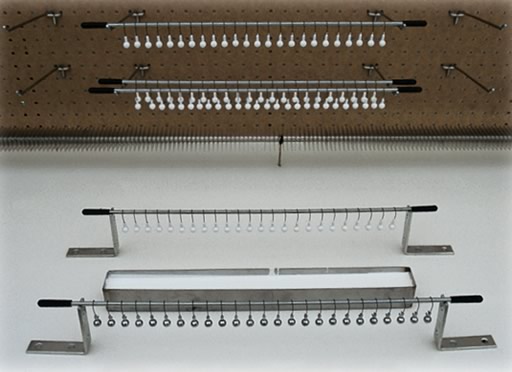
You will need at least 100 1/8" x 8" pegboard hooks (Use 1/4" hooks
for jigs larger than 1/2 oz.). Grind or file 4 evenly spaced small grooves
in the top of each pegboard hook to keep your threaded rods from sliding.
The first groove should be 1-1/2" from the pegboard and then one
every 1-1/2". Threaded rod works well for hanging jigs since the
grooves keep the jigs from sliding. Your rod size will vary from 1/4" to
3/8" or even 1/2" depending on jig size, due to the fact that
heavier jigs may cause thinner rods to bend. Hooks and rods are available
through Component Systems.
Our stainless steel dip tray is 16" long and our 1/4" dip
rods are 20" long. Set your first set of pegboard hooks about 5" above
the heating element and space them about 18" apart. You should be
able to get at least 3 sets of hooks across from left to right. Now between
your three sets of hooks with four sets of notches each you have a capacity
of 12 rods for this row. This means that depending on your jig size you
could get as many as 360 jigs per row. Position the next row of hooks
directly above the first row. Placement of each row will depend on the
size of the jigs being painted. Continue hook placement to within about
2" from the top of the pegboard.
To begin the painting process, sit in front of the table on a chair
that adjusts up and down for comfort. Place your dip tray in the center
of the table, about 6" from the front edge. Next, file a large groove
in one end of four 4" metal “L” brackets. Fasten 2 of
these to the table with the groove end up about 3" beyond the dip
tray and the same distance apart as the dip tray is long. These will
serve as a rack to temporarily hold your dip rod. Now fasten the other
2 brackets in front of the dip tray. These 2 brackets should also be
the same distance apart as your dip tray is long. These brackets will
hold your dip rod for loading unpainted jigs.
Mix white basecoat thoroughly with a wooden stir stick using a lifting
motion. Pour enough white into the dip tray so that the jig heads will
be completely covered when dipped. Be careful not to over fill tray as
spillage may occur from paint displacement as jigs are dipped.
Remove dip rod of jigs from paint and pause above the tray while excess
drips off. After one or two drips (depending on jig size), place the
rod on the 2 “L” brackets you fastened 3" beyond the
dip tray. This is where the rod will remain while the final drop forms
on the end of the jig. Meanwhile, start loading unpainted jigs on your
next rod. Approximately 20 to 40 seconds after placing rod of painted
jigs on brackets, dab the small drop that has formed with a stiff piece
of paper. This should be done before the paint “skims” over,
but not before most of the paint has had a chance to run down. Now move
the dabbed rod to the first set of notches on a pair of hooks on the
lowest row of your pegboard. Finish loading the next rod with unpainted
jigs and
repeat the process.
After you have basecoated the desired amount of jigs, return unused
white paint to can and clean dip tray. Now pour in new color and repeat
process starting with the first rod of jigs you painted white. This same
process can be used to add a final gloss coat of clear vinyl or epoxy
as desired.
When all painting is complete, place a piece of 1/4" plywood 74" long
and 48" wide against the front of the 2 pine boards attached to
either side of the pegboard. You now have a box with an open top. Cover
the top with another piece of plywood or cardboard, leaving a slight
opening for air to escape. Next, plug in your heating element and leave
on overnight. A continuous flow of air will move through the box from
the lower holes in the pegboard and escape through the crack left open
at the top.
A small meat thermometer can be pushed through a hole in the pegboard
and used to monitor the heat inside the box. It should be approximately
130° F which is sufficient to drive off most solvents within 14 hours.
The next morning allow the jigs to cool for 30 minutes with the box open.
Jigs are now ready for bulk packaging.
During the heating cycle, nothing should be within 3" of the heating
element. Carefully monitor the heating cycle the first several times
to ensure proper function. Remember, vinyl paint is flammable, so no
smoking or open flames in work area. Always use adequate ventilation
while painting and drying.